SAML single sign-on (SSO)
SAML authentication requires an Enterprise subscription.
Setup (SaaS)
To enable SAML authentication for your Flagsmith organisation, you must send your identity provider metadata XML document to support@flagsmith.com.
Once Flagsmith has configured your identity provider, we will send you a service provider metadata XML document or an Assertion Consumer Service (ACS) URL to use with your identity provider.
Setup (self-hosted)
To enable SAML for your Flagsmith organisation in a self-hosted environment, you will need access the Django admin interface.
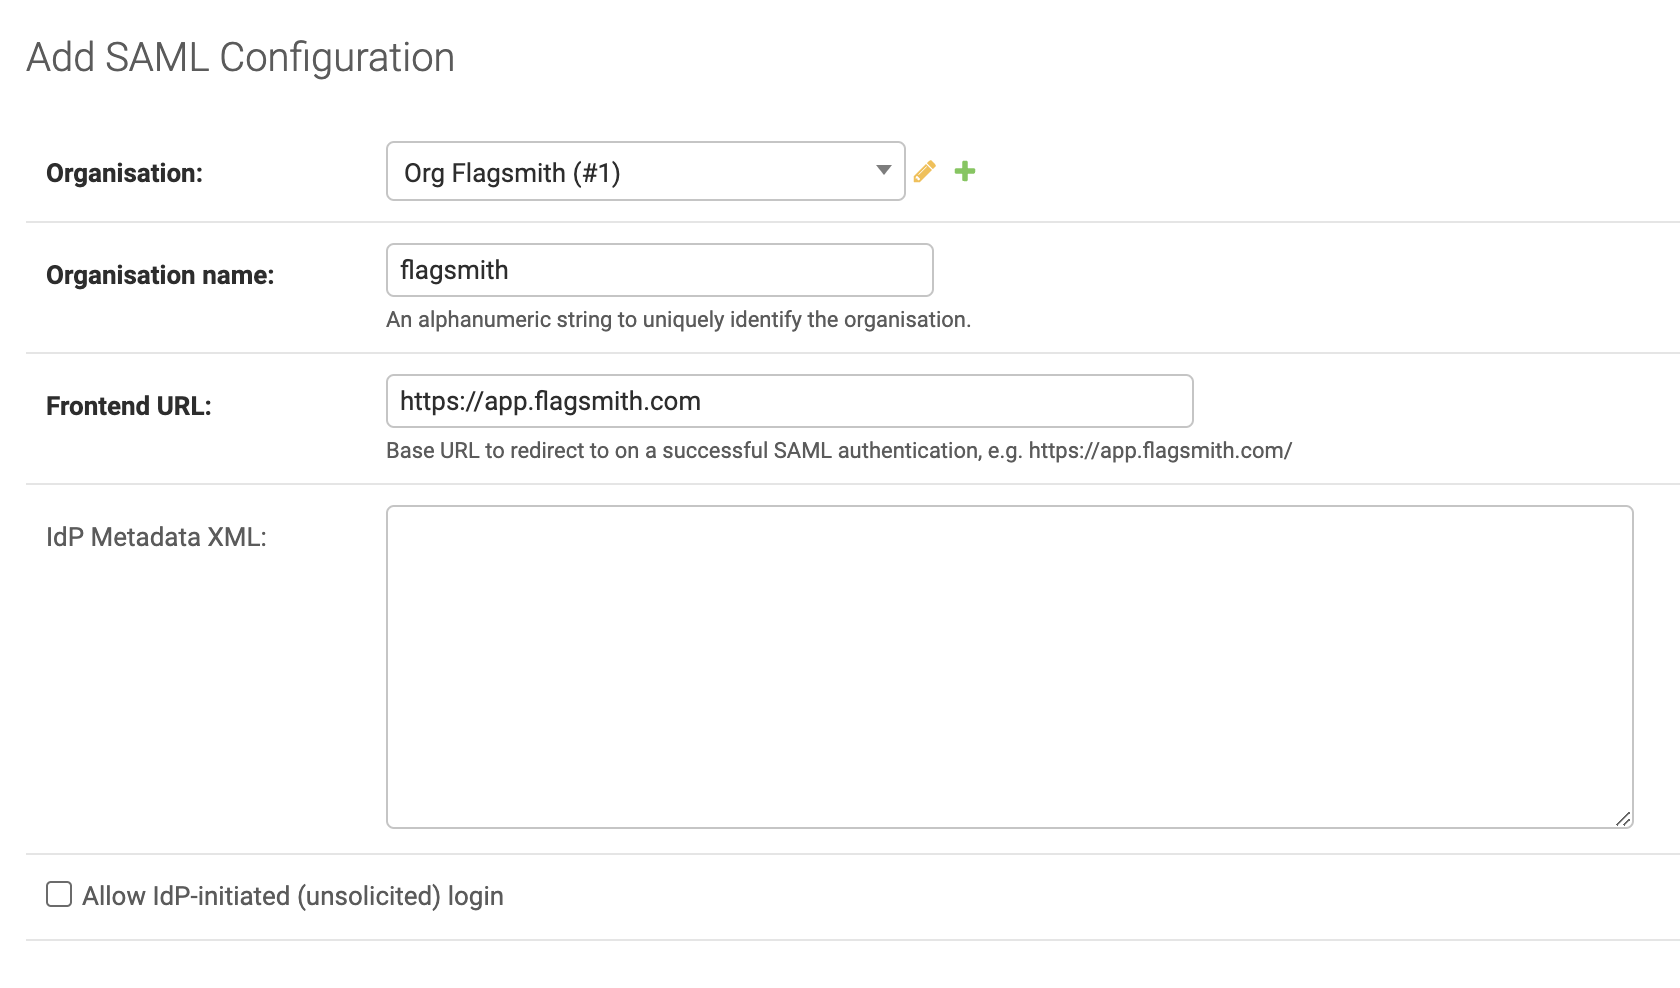
In the Django admin interface, click on the "SAML Configurations" option in the menu on the left. To create a new SAML configuration, click on "Add SAML Configuration" in the top right corner.
You should see a screen similar to the following:

From the drop down next to Organisation, select the organisation that you want to configure for SAML authentication.
Next to Organisation name, add a URI-safe name that uniquely identifies the organisation. Users will need to provide this name when selecting the "Single Sign-On" option at the Flagsmith login screen.
Next to Frontend URL, add the URL where your Flagsmith frontend is running. Users will be redirected to this URL when they authenticate using SAML.
Copy your identity provider's XML metadata document into the IdP metadata XML field, or leave it blank and come back to this step later if you do not have it.
If you want to enable IdP-initiated SSO, check the box next to Allow IdP-initiated (unsolicited) login. If you are unsure, leave this box unchecked.
Hit the Save button to create the SAML configuration.
Once your SAML configuration is created, you can download your Flagsmith service provider metadata by going back to the list of SAML configurations in the Django admin interface and clicking "Download" on the SAML configuration you just created.
Assertion Consumer Service URL
The assertion consumer service (ACS) URL, also known as single sign-on URL, for this SAML configuration will be at the
following path, replacing flagsmith.example.com with your Flagsmith API's domain:
https://flagsmith.example.com/api/v1/auth/saml/YOUR_SAML_CONFIGURATION_NAME/response/
Canonicalization methods
Some identity providers require the service provider to support canonicalization methods that are not allowed by default. You can see the methods that are enabled by default here.
You can enable additional canonicalization methods by setting the EXTRA_ALLOWED_CANONICALIZATIONS environment variable
to a comma-separated list of canonicalization method URIs. For example:
EXTRA_ALLOWED_CANONICALIZATIONS=http://www.w3.org/TR/2001/REC-xml-c14n-20010315#,http://www.w3.org/TR/2001/REC-xml-c14n-20010315#WithComments
Force SSL after authentication
You can configure Flagsmith to ignore the X-Forwarded-Proto HTTP header and always use HTTPS for the ACS URL by
setting the SAML_FORCE_SSL environment variable to True.
Attribute mapping
Flagsmith will look for the following SAML attributes, in order, to uniquely identify a SAML user:
subject-iduidNameID
Flagsmith also maps user attributes from the following claims in the SAML assertion:
| Flagsmith attribute | IdP claims |
|---|---|
email | mail, email or emailAddress |
first_name | gn, givenName or the first part of displayName |
last_name | sn, surname or the second part of displayName |
You can override these mappings by adding the corresponding IdP attribute names to your SAML configuration from the Django admin interface.
Permissions for SAML users
By default, users logging in via SAML will have no permissions to view or modify anything in the Flagsmith dashboard. You can customise this by creating a group with the "Add new users by default" option enabled, and assigning your desired default permissions to that group.
Using groups from your SAML IdP
Flagsmith can add or remove a user from groups based on your identity provider's SAML response when logging in.
When a user logs in, Flagsmith will assign groups to a user based on the groups claim values from your identity
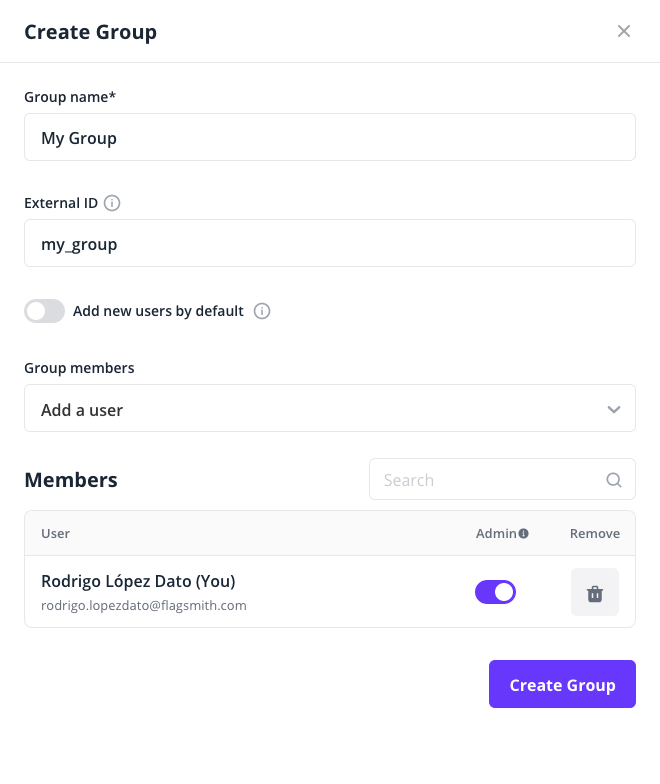
provider's SAML assertion. Each value of the groups claim should correspond to the "External ID" of a Flagsmith group,
which can be set during group creation:

For example, a SAML assertion with the following groups claim would assign the user to the Flagsmith groups with
external IDs of my_group and my_other_group:
<saml2:Attribute Name="groups">
    <saml2:AttributeValue
        xmlns:xs="http://www.w3.org/2001/XMLSchema"
        xmlns:xsi="http://www.w3.org/2001/XMLSchema-instance" xsi:type="xs:anyType">my_group
    </saml2:AttributeValue>
    <saml2:AttributeValue
        xmlns:xs="http://www.w3.org/2001/XMLSchema"
        xmlns:xsi="http://www.w3.org/2001/XMLSchema-instance" xsi:type="xs:anyType">my_other_group
    </saml2:AttributeValue>
</saml2:Attribute>